本文所有的代码均存于
https://github.com/MADMAX110/BitsandPizzas
设计支持库(Design Support Library)是 Google 在 2015 年的 I/O 大会上发布的全新 Material Design 支持库,在这个 support 库里面主要包含了 8 个新的 Material Design 组件,最低支持 Android 2.1。
设计支持库提供了一系列 Material Design 风格的组件,帮助开发者快速构建符合 Material Design 规范的 Android 应用程序。这些组件包括:
TextInputLayout:EditText 辅助控件,提供输入提示、错误提示等功能。
FloatingActionButton:MD 风格的圆形按钮,通常用于表示主要操作。
Snackbar:提示框,用于显示简短的提示信息。
TabLayout:选项卡,用于在多个选项之间进行切换。
NavigationView:DrawerLayout 的侧滑界面,用于显示导航菜单。
CoordinatorLayout:超级 FrameLayout,用于实现复杂的布局交互效果。
AppBarLayout:MD 风格的滑动 Layout,用于实现可折叠的标题栏。
CollapsingToolbarLayout:可折叠的 MD 风格 ToolbarLayout,用于实现可折叠的标题栏。
MaterialButton:Material 风格的 Button。
Chip & ChipGroup:关键字标签组件。
MaterialCardView:Material 风格的 CardView。
BottomAppBar:底部标题栏。
针对之前的BitsandPizzas应用,我们可以为其添加更多的设计支持库的特性。
1、支持MainActivity的工具条滚动
2、为OrderActivity增加一个折叠工具条
3、向OrderActivity增加一个FAB浮动动作按钮
4、让FAB显示一个snackbar
一、让工具条响应滚动
1、修改MainActivity的布局以支持工具条滚动。
2、修改TopFragment,让它包含可滚动的内容。
与此同时,片段中的内容滚动时,我们要让工具条也滚动,为此要为MainActivity增加一个协调器布局CoordinatorLayout。协调器布局就像一个马力很足的帧布局,用来协调不同视图之间的动画和过渡。在这里我们将用协调器布局协调TopFragment中的可滚动内容和MainActivity的工具条。
下面是在MainActivity的布局增加一个协调器布局。
除此之外还要协调滚动行为。
标记用户将滚动的视图,让工具条对它做出响应。
要标记用户将滚动的视图,需要指定该视图的属性app:layout_behavior,把它设置为内置字符串“@string/appbar_scrolling_view_behavior”。
这会告诉协调器布局:你希望用户滚动这个视图时应用条布局中的视图能够做出响应。在这里我们希望工具条滚动来相应用户滚动视图分页控件的内容,所以要为ViewPager元素增加app:layout_behavior属性。
还需要告知工具条响应滚动事件:使用属性app:layout_scrollFlags告诉应用条布局中的视图如何响应滚动事件。
在这里设置为当用户向上滚动视图分页控件内容时,工具条要向上滚动移出屏幕,当用户向下滚动时,它要迅速返回原来的位置。为此要把Toolbar的该属性设置为scroll | enterAlways、Scroll使得视图可以滚动移出屏幕,不然将会固定在屏幕上方、enterAlways表示用户滚动相应的视图时工具条也会快速向下滚动到它原来的位置。即使没有这个值,工具条也会向下滚动,不过会比较慢。
<?xml version="1.0" encoding="utf-8"?>
<androidx.coordinatorlayout.widget.CoordinatorLayout
    xmlns:android="http://schemas.android.com/apk/res/android"
    xmlns:app="http://schemas.android.com/apk/res-auto"
    xmlns:tools="http://schemas.android.com/tools"
    android:layout_width="match_parent"
    android:layout_height="match_parent"
    tools:context=".MainActivity">

    <com.google.android.material.appbar.AppBarLayout
        android:layout_width="match_parent"
        android:layout_height="wrap_content"
        android:theme="@style/ThemeOverlay.AppCompat.Dark.ActionBar" >

        <androidx.appcompat.widget.Toolbar
            android:id="@+id/toolbar"
            android:layout_width="match_parent"
            android:layout_height="?attr/actionBarSize"
            app:layout_scrollFlags="scroll|enterAlways"/>

        <com.google.android.material.tabs.TabLayout
            android:id="@+id/tabs"
            android:layout_width="match_parent"
            android:layout_height="wrap_content"/>

    </com.google.android.material.appbar.AppBarLayout>

    <androidx.viewpager.widget.ViewPager
        android:id="@+id/pager"
        android:layout_width="match_parent"
        android:layout_height="match_parent"
        app:layout_behavior="@string/appbar_scrolling_view_behavior"/>

</androidx.coordinatorlayout.widget.CoordinatorLayout>
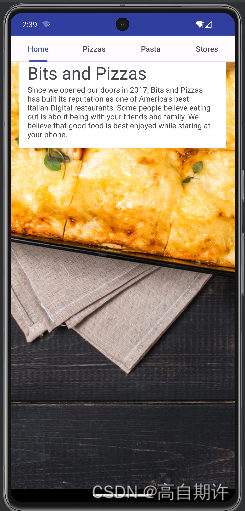
二、为TopFragment增加可滚动的内容
修改这个片段使其包含一个图像和一些文本可使其滚动。
1、增加字符串资源
<string name="company_name">Bits and Pizzas</string>
<string name="restaurant_image">Restaurant image</string>
<string name="home_text">Since we opened our doors in 2017, Bits and Pizzas
        has built its reputation as one of America’s best Italian-Digital restaurants. Some
        people believe eating out is about being with your friends and family. We believe that
        good food is best enjoyed while staring at your phone.</string>
2、向drawable文件夹中增加下面的图片

三、使用嵌套滚动视图使布局内容可滚动
使用一个嵌套滚动视图,允许用户滚动TopFragment的内容。这种视图的工作与普通的滚动视图很类似,只不过它还支持嵌套滚动,因为协调器布局只监听嵌套滚动事件。如果在布局中使用一个普通的滚动视图,用户滚动内容时工具条并不会滚动。
现在TopFragment的布局结构要增加一个餐厅图像和一些文本。在写代码之前先来分析一下这个布局的结构。
1、整个片段都是可以滚动的,这说明我们要把所有的视图都放在一个嵌套滚动视图中。
2、我们要使用两个文本视图显示公司名和文本。这两个文本视图将放在一个有白色背景的垂直线性布局中。
3、我们希望在一个图像上面显示这个包含两个文本视图的线性布局。为此要把它们放在一个帧布局中。
下面是fragment_top.xml的完整代码。
<?xml version="1.0" encoding="utf-8"?>
<androidx.core.widget.NestedScrollView xmlns:android="http://schemas.android.com/apk/res/android"
    xmlns:tools="http://schemas.android.com/tools"
    android:layout_width="match_parent"
    android:layout_height="match_parent"
    tools:context=".TopFragment">

    <FrameLayout
        android:layout_width="match_parent"
        android:layout_height="wrap_content">

        <ImageView
            android:id="@+id/info_image"
            android:layout_width="match_parent"
            android:layout_height="wrap_content"
            android:scaleType="centerCrop"
            android:src="@drawable/img"
            android:contentDescription="@string/restaurant_image"/>

        <LinearLayout
            android:layout_width="match_parent"
            android:layout_height="wrap_content"
            android:layout_marginTop="40dp"
            android:layout_marginLeft="16dp"
            android:layout_marginRight="16dp"
            android:padding="16dp"
            android:background="#FFFFFF"
            android:orientation="vertical" >

            <TextView
                android:textSize="32sp"
                android:layout_width="match_parent"
                android:layout_height="match_parent"
                android:text="@string/company_name" />

            <TextView
                android:layout_width="match_parent"
                android:layout_height="wrap_content"
                android:text="@string/home_text"/>

        </LinearLayout>
    </FrameLayout>

</androidx.core.widget.NestedScrollView>
试一试应用
向上滚动内容时,工具条也向上滚动。
四、向OrderActivity增加折叠工具条
除了让工具条滚动,另一种做法是折叠工具条。折叠工具条开始时很大,用户向上滚动屏幕内容时,折叠工具条会收缩,而当用户向下滚动屏幕内容时,折叠工具条会再展开。甚至可以为它增加一个图像,当工具条达到它的最小高度时,这个图像会消失,而当工具条展开时图像会重新可见。
首先增加一些字符串资源:
    <string name="order_name_hint">Please enter your name</string>
    <string name="order_details_hint">Please enter your order</string>
更新activity_order.xml
<?xml version="1.0" encoding="utf-8"?>
<androidx.coordinatorlayout.widget.CoordinatorLayout
    xmlns:android="http://schemas.android.com/apk/res/android"
    xmlns:app="http://schemas.android.com/apk/res-auto"
    xmlns:tools="http://schemas.android.com/tools"
    android:id="@+id/coordinator"
    android:layout_width="match_parent"
    android:layout_height="match_parent"
    tools:context=".OrderActivity">

    <com.google.android.material.appbar.AppBarLayout
        android:layout_width="match_parent"
        android:layout_height="300dp"
        android:theme="@style/ThemeOverlay.AppCompat.Dark.ActionBar">

        <com.google.android.material.appbar.CollapsingToolbarLayout
            android:layout_width="match_parent"
            android:layout_height="match_parent"
            app:layout_scrollFlags="scroll|exitUntilCollapsed"
            app:contentScrim="?attr/colorPrimary">

            <ImageView
                android:layout_width="match_parent"
                android:layout_height="match_parent"
                android:scaleType="centerCrop"
                android:src="@drawable/img"
                android:contentDescription="@string/restaurant_image"
                app:layout_collapseMode="parallax"/>

            <androidx.appcompat.widget.Toolbar
                android:id="@+id/toolbar"
                android:layout_width="match_parent"
                android:layout_height="?attr/actionBarSize"
                app:layout_collapseMode="pin" />

        </com.google.android.material.appbar.CollapsingToolbarLayout>
    </com.google.android.material.appbar.AppBarLayout>

    <androidx.core.widget.NestedScrollView
        android:layout_width="match_parent"
        android:layout_height="match_parent"
        app:layout_behavior="@string/appbar_scrolling_view_behavior" >

        <LinearLayout
            android:layout_width="match_parent"
            android:layout_height="wrap_content"
            android:orientation="vertical"
            android:padding="16dp">

            <EditText
                android:layout_width="match_parent"
                android:layout_height="wrap_content"
                android:hint="@string/order_name_hint" />

            <EditText
                android:layout_width="match_parent"
                android:layout_height="wrap_content"
                android:hint="@string/order_name_hint" />

        </LinearLayout>

    </androidx.core.widget.NestedScrollView>

</androidx.coordinatorlayout.widget.CoordinatorLayout>
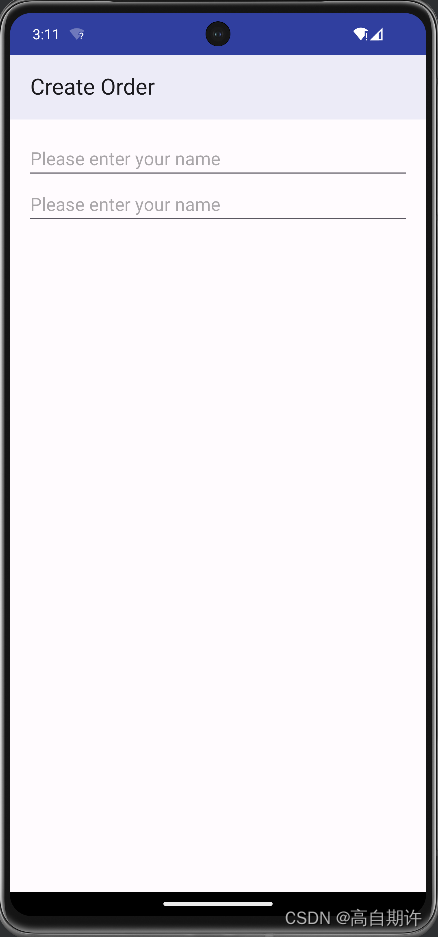
试一试应用:
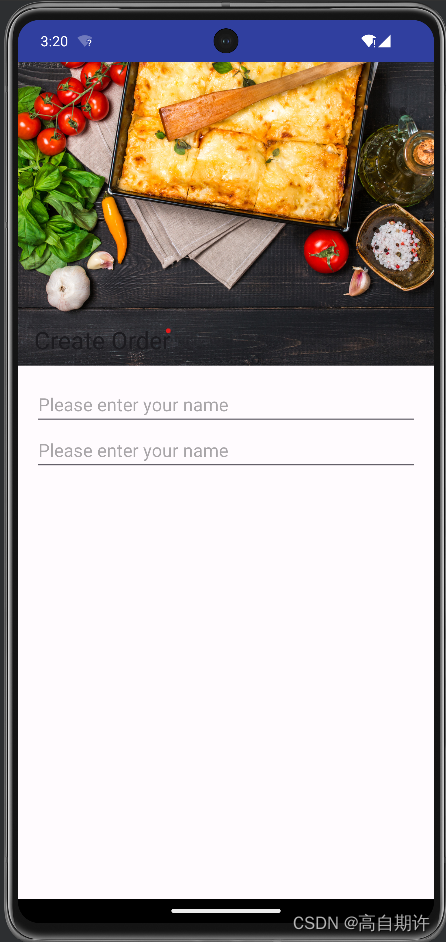
向上滑动后变为:
五、FAB和snackbar
FAB是浮动动作按钮,这是一个圆形图标,浮在用户界面之上,例如可能位于屏幕的右下角。FAB用来提示一些相当常用或者非常重要的动作,用户能够一目了然地看到它。
snackbar和toast很类似,不过snackbar还允许交互。这是一个简短的消息,显示在屏幕的下方,可以为用户提供某个操作有关信息。与toast不同,可以为snackbar增加动作,如撤销某个操作的动作。
增加FAB图标,将下列图标增加到工程中,命名为done

向activity_order.xml布局中增加FAB
    <com.google.android.material.floatingactionbutton.FloatingActionButton
        android:layout_width="wrap_content"
        android:layout_height="wrap_content"
        android:layout_gravity="end|bottom"
        android:layout_margin="16dp"
        android:src="@drawable/done"
        android:onClick="onClickDone" />
让用户单击FAB时显示一个snackbar
更新OrderActivity.java代码:
package com.hfad.bitsandpizzas;

import androidx.appcompat.app.ActionBar;
import androidx.appcompat.app.AppCompatActivity;
import androidx.appcompat.widget.Toolbar;

import android.annotation.SuppressLint;
import android.os.Bundle;
import android.view.View;
import android.widget.Toast;

import com.google.android.material.snackbar.Snackbar;

public class OrderActivity extends AppCompatActivity {

    @SuppressLint("RestrictedApi")
    @Override
    protected void onCreate(Bundle savedInstanceState) {
        super.onCreate(savedInstanceState);
        setContentView(R.layout.activity_order);
        Toolbar toolbar = (Toolbar) findViewById(R.id.toolbar);
        setSupportActionBar(toolbar);
        //需要使用支持库中的工具条
        ActionBar actionBar = getSupportActionBar();
        //启用向上按钮,尽管我们要用一个工具条作为应用条
        actionBar.setDefaultDisplayHomeAsUpEnabled(true);
    }

    public void onClickDone(View view){
        CharSequence text = "Your order has been updated";
        //让其显示很短的时间
        int duration = Snackbar.LENGTH_SHORT;
        Snackbar snackbar = Snackbar.make(findViewById(R.id.coordinator), text, duration);
        snackbar.setAction("Undo", new View.OnClickListener(){

            @Override
            public void onClick(View view) {
                Toast toast = Toast.makeText(OrderActivity.this, "Undone!", Toast.LENGTH_SHORT);
                toast.show();
            }
        });
        snackbar.show();
    }
}
试一试


